It's great and addictive snack for Chinese New Year. It's crispy on the outside, soft and chewy on the inside. Max and my mother-in-law was impressed when I serve them this. Max even says "Ohhumm... I'm eating nian-gao like a boss! This is so good!".... this really makes me cracked up!

I fried nian-gao last year (See recipe here). I sandwiched the nian-gao with sweet potatoes and yam. That's the usual way of frying em'.
This time, I don't do it for a party or something. I just did it for our own consumption. And I'm looking into something something that is easy to eat, less messy and can be kept well. So, I improvised my Fried Sweet Potato Balls (炸番薯蛋) into fried nian-gao balls instead. One side is sweet potato dough, the other side is taro dough. Yummm!!!

This recipe makes 40 balls if it is at the size of a golf ball, or up to 50 balls if it is smaller. Depends on how big you want the nian-gao balls be. I got 50 pcs from this recipe.
Ingredients
(Source : Improvised from my Fried Sweet Potato Balls (炸番薯蛋) recipe)
- about 500g Sticky Rice Cake 年糕 (use hardened sticky rice cake)
- enough oil for deep-frying
- about 220g Taro 芋头 (I use Thai Taro)
- 210g Glutinous Rice Flour 糯米粉
- 1 tbsp Rice Flour 粘米粉
- 15g Corn Flour 玉米粉
- 65g Sugar 糖
- 1/4 tsp Salt 盐
- 2 tbsp Corn Oil 油
- 2 tbsp Water 水
- about 220g Orange Sweet Potatoes 橙色番薯
- 210g Glutinous Rice Flour 糯米粉
- 1 tbsp Rice Flour 粘米粉
- 15g Corn Flour 玉米粉
- 65g Sugar 糖
- 1/4 tsp Salt 盐
- 2 tbsp Corn Oil 油
- 2 tbsp Water 水
Additional Note : There are readers feedback that the dough is dry. It's very much depends on the moisture level of your steamed potatoes and steamed taro. If your dough is dry, just add more water and oil.
Method
- Cut nian-gao into desired cube size.
- Skinned sweet potatoes and taro, cleaned, cut into big chunk. Steam both sweet potatoes and taro until soft.
- In a big bowl, mash the potatoes. And in another bowl, mash the taro.
- For Taro dough - Add in mashed taro and the rest of the taro dough ingredients into mixer bowl. Let the mixer do the work. If you are using hand, mix all ingredients together and knead lightly to form a smooth dough. If you think there's a need, do add another tablespoon of oil to make the dough more smooth.
- For Sweet Potato dough - Same. Add in mashed potato and the rest of the mashed potato dough ingredients into mixer bowl and let the machine do the work. If you are using hand, it is the same. Just knead lightly to form a smooth dough.
- Pinch a small piece of taro dough, and a small piece of sweet potato dough (about 1 tsp each). Joint them together. With both palm, roll and form into a smooth ball. Flattened the dough and wrap a piece of nian-gao cube at the center. Roll into a ball. Pinch more dough to cover the holes if needed.
- Heat up oil in a wok, with low fire. Once fire is heated well, put the balls into the wok, estimate about 6 to 8 balls each time, slowly fry until it turned golden brown. This should take about 3 minutes. Remove and drain on a paper towel.
- Repeat the frying process until all nian-gao balls are done. Serve immediately.
- DO NOT discard the sides of the nian-gao cuts. I didn't waste any single piece of my nian-gao bits. They can be gathered and can be wrapped into balls too. This is how I make 50 nian-gao balls out of my 500g medium sized nian-gao :)
- When wrapping the nian-gao with the dough, try to make sure that every corner of the nian-gao are well covered with dough. If not, the nian-gao might burst and leaked out of the dough during deep-frying process.
- If you intend to make the nian-gao balls bigger, the deep-frying time will be longer. To ensure you are not eating half-cooked dough, do fry it slowly under low fire to let it slowly cook in the pool of oil.

Pinch a small piece of each dough and joint them together.

Flattened the dough and wrap a piece of nian-gao cube at the center.
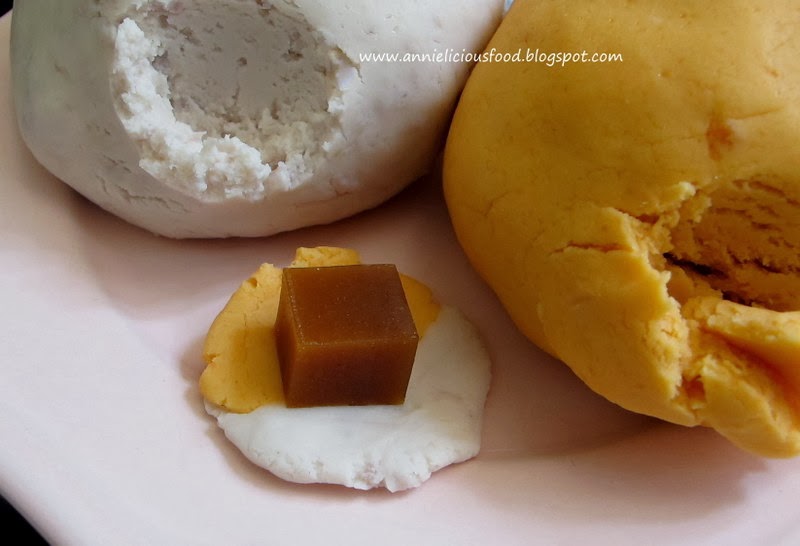
With both palms, gently roll them into a ball. Pinch more dough to cover the holes if needed. And here, you will have taro and sweet potato flavor dough.

You can use one type of dough only if you think two flavor is too tedious. However, I felt that two flavors joint together makes great taste. I love this recipe and I like this way of eating nian-gao. The 'crust' stays crunchy quite long and it kept well too.
If you intend to make them in advance and store them, follow this method :
- Fry the nian-gao balls until cooked (pale golden color). Drain and set aside to let it cool.
- Once nian-gao balls are cooled, pack them into a sandwich bag (preferably air-tight of course).
- Store them into the fridge if you are eating them in 2 to 3 days time OR if you are eating them after a week or so, store them into the freezer - Thaw it overnight before you reheat it.
- To reheat : Deep-fry room temperature nian-gao balls under medium low fire until golden brown color. Serve immediately. For this step, you can use air-fryer to do the work if you don't want to deep-fry. It's just that the result of air-fry would be dryer and the crust will tend to turn harder.
For me, I prepared the whole batch, I serve 10pcs fresh, gave 20pcs away and and keep the balance 20pcs in the fridge for next time. Deep-fried food intake need to be controlled. This is a great way to prepare your nian-gao balls in advance. Just re-heat it before you bring them to the party as part of the party snacks. I'm sure your family and friends will love it.

This new way of eating nian-gao will definitely change the way you feel about eating sticky rice cake during Chinese New Year! Do give this auspicious traditional food a try! :)


